Creating a customer bank access

 
Explanation

You create a customer bank access for a financial institution. The application supports bank accesses with the protocols EBICS and FinTS.

The function for working with FinTS is not part of the standard scope of the application.

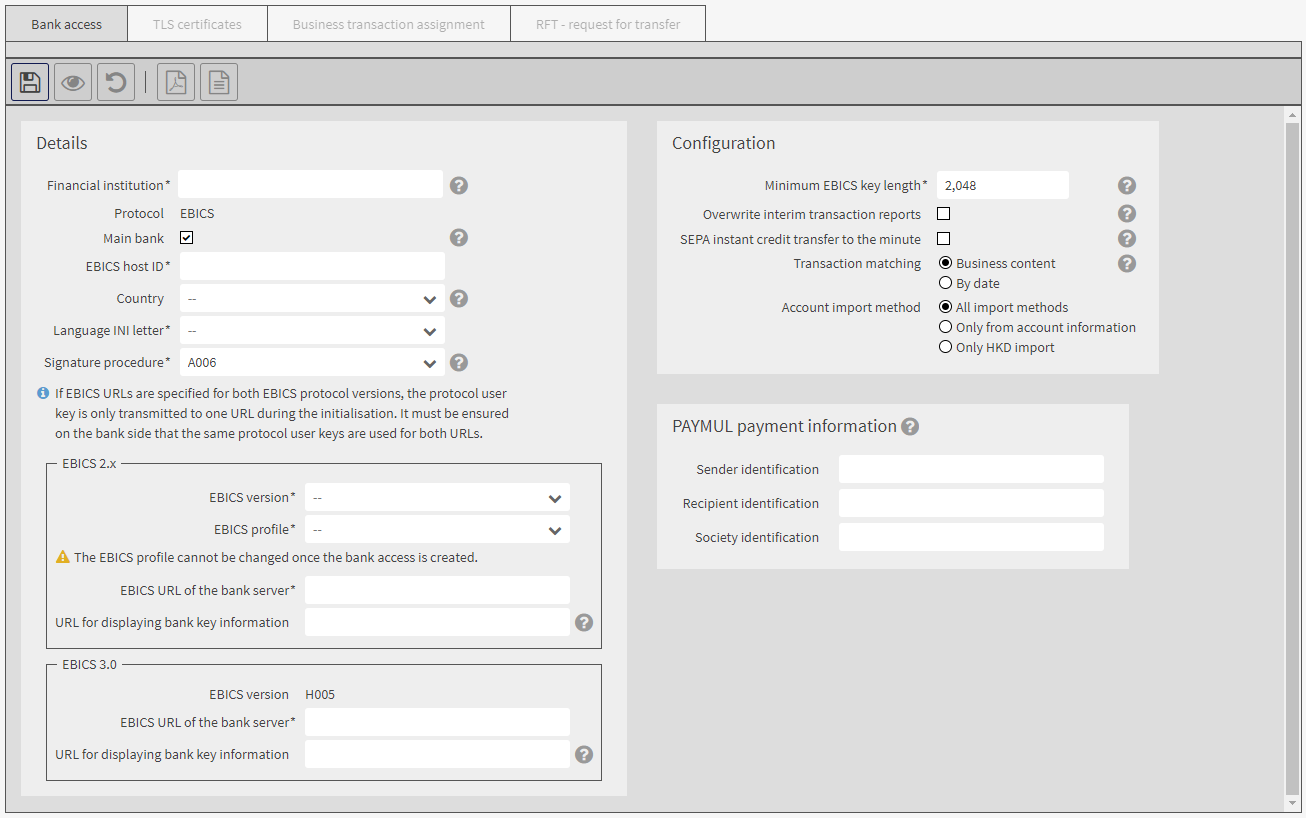
For an EBICS customer bank access you define the URL of the EBICS server, the EBICS version and the EBICS profile. If the separate authorisation for the creation of MT101 orders has been assigned to you, you can assign instruction keys for the creation of MT101 orders.

In order to use the EBICS customer bank access, the user must initialise an own bank access for the customer bank access and activate his bank keys.

For a FinTS bank access you enter the data of the financial institution. Finally, you download the TLS certificate from the server of the financial institution.

Customer bank accesses are permanently assigned to one customer.

Prerequisite

You have the data on the bank access for the financial institution.

Your user ID is assigned the rights Customer bank accesses: edit (customer) and Customer bank accesses: read (customer).

Your customer may generally create new EBICS and/or FinTS bank accesses. This setting can be checked in the mask Settings ➔ Customer settings, tab Basic data, field Supported bank accesses.

Procedure for creating an EBICS bank access

1.

Select Settings ➔ Customer settings, tab Customer bank accesses.

2.

Click on .

3.

Only if you can also create FinTS bank accesses: select Create EBICS customer bank access.

An input mask opens in which you can enter the details of the bank access:

4.

Enter the data of the bank access:

Field name

Description

Tab Bank access

Financial institution

Name of the bank access

This is the name under which the bank access is created. The name is displayed for users when they are creating an own bank access.

Checkbox Main bank

If this checkbox is activated, the bank access may be used by all users of this customer.

If the checkbox is not activated, only users with the authorisation All bank accesses permitted can use this bank access.

You can find the user authorisations in the basic data of the user in the area Authorisations.

EBICS host ID

Host ID of the EBICS server of your financial institution

The host ID may only contain uppercase letters and digits and may not exceed a length of 8 characters.

Country

Optional: country that shall be assigned to the financial institution

This value does not impact the behaviour of the application. The country can be evaluated by external applications.

Language INI letter

Language in which the INI letter is generated

User language

The INI letter is generated in the language that is set in the application for the user who later initialises the bank access.

All other languages

The INI letter is generated in the selected language.

Signature procedure

EBICS signature procedure which is preset when the user sets up an EBICS bank access on the basis of this customer bank access

The signature procedure is used when initialising and using EBICS bank accesses for the electronic signature.

Mask area EBICS 2.x

EBICS version

Mandatory field if you do not specify an EBICS 3.0 server

EBICS version that shall be used to communicate with this financial institution

Possible values:

H003 (EBICS protocol version 2.4)

H004 (EBICS protocol version 2.5)

EBICS profile

Country profile of the EBICS protocol

EBICS-DE

EBICS profile for German and other non-French bank accesses

EBICS-FR

EBICS profile for French bank accesses

Attention:

This setting affects the EBICS communication with the financial institution. It cannot be changed later on.

EBICS URL of the bank server

Mandatory field if you do not specify an EBICS 3.0 server

URL of the EBICS 2.x server on the bank side

URL for displaying bank key information

Optional: URL via which the user can view information on the public key of the financial institution for EBICS 2.x

This information is displayed for the user during the initialisation of this bank access.

Mask area EBICS 3.0

EBICS URL of the bank server

Mandatory field if you do not specify an EBICS 2.x server

URL of the EBICS 3.0 server on the bank side

URL for displaying bank key information

Optional: URL via which the user can view information on the public key of the financial institution for EBICS 3.0

This information is displayed for the user during the initialisation of this bank access.

Mask area Configuration

Minimum EBICS key length

Define the minimum EBICS key length. The minimum value for the key length preset by the application is displayed in the tool tip. It is derived from the currently recommended security guidelines.

The key length is also configured by your financial institution. If your financial institution provides a longer key than the one you entered in this mask, the longer key is valid. In this case, the user working with this bank access is informed on the start page that the keys must be updated (see sections Updating EBICS transport keys and Changing EBICS signature key and EBICS transport keys).

Overwrite interim transaction reports

Activate this checkbox if the bank server always sends all interim transaction reports.

This way, you can prevent interim transactions from being displayed repeatedly in the list of transactions.

Download to the minute

If the bank server supports data downloads to the minute, you can activate this option to avoid downloading redundant data. You can thus optimise the download volume.

SEPA instant credit transfer to the minute

Activate the checkbox so that a user can specify not only an execution date but also a time for this bank access during the creation of instant payments.

For the bank access, the order type CIP or for EBICS 3.0 the BTF SCI/DE//pain.001/ must also be permitted for the bank server.

A separate authorisation is required for SEPA real-time credit transfers.

Transaction matching

Intraday transactions (interim transactions) are replaced by end-of-day transactions after booking. In the application, the transaction matching usually takes place via a comparison of the business content of the intraday transactions and the end-of-day transactions. If the technical content of the intraday transaction differs slightly from the transaction in the end-of-day statement, the application may not be able to recognise that it is the same transaction. In this case, transaction matching by date can be useful. Then the intraday transactions are removed when an end-of-day statement is imported for that day.

Select how you want the application to handle intraday and end-of-day transaction matching:

Business content

By date (not part of the standard scope of the application)

This function requires a special authorisation.

Account import method

If your financial institution supplies new ordering party accounts, the application creates the accounts automatically.

Select which method the application should use to create new ordering party accounts:

Only HKD import: the application evaluates the data from the HKD message (download customer and protocol user information of the customer) of the bank server and then creates new ordering party accounts.

Only from account information (not included in the standard scope of the application): the application accepts new ordering party accounts only from account information provided by the bank server. If new accounts are supplied in the HKD, they are ignored.

All import methods (only if the above option is selectable): the application evaluates both the HKD message and the account information and creates new ordering party accounts that are included.

This function requires a special authorisation.

Mask area PAYMUL payment information

Sender identification

Optional: identification code of the financial institution

Max. 35 characters, alphanumeric

Recipient identification

Optional: identification code of the recipient

Max. 35 characters, alphanumeric

Society identification

Optional: identification code of the society

Max. 6 characters, alphanumeric

5.

If you have entered all data correctly, go to the tab TLS certificates.

If you have specified URLs for EBICS 2.x and EBICS 3.0, the TLS certificate is displayed for each version. In that case, perform the following steps for each certificate.

In the following, it is assumed that you have specified exactly one URL.

The certificate is required for the encrypted transfer of data between the portal and the EBICS server.

The users can only use the bank access if the certificate has been accepted (provided that the bank access is assigned to them).

On this tab, the known details of the certificate and the issuer are displayed.

The value in the field Certificate status has the following meaning:

Accepted by user: The TLS certificate has been accepted by a user.

Accepted by JVM: The downloaded certificate has been accepted automatically (by the JVM, Java Virtual Machine) because it has been issued by a trustworthy certification authority.

Not accepted: The certificate has been downloaded but not accepted, because there are doubts as to its authenticity. EBICS communication with the EBICS server is not possible.

No certificate available: The certificate for encrypted communication has not been successfully downloaded yet.

6.

If the certificate has not been accepted automatically: Click on Download TLS certificate.

As soon as you click on Download TLS certificate, the TLS certificate is set to Not accepted. The bank access cannot be used by the users until you confirm the authenticity of the certificate.

7.

Check the authenticity of the certificate.

8.

If you are certain that the certificate was issued by a trustworthy certification authority, click on Accept TLS certificate.

The status of the certificate changes to Accepted by user.

9.

On the tab Business transaction assignment you can assign order types (for EBICS 2.x) and/or BTFs (for EBICS 3.0) to business transactions. The assignment serves to uniquely define business transactions for this bank access regardless of the EBICS version used.

For a newly created bank access, the assignment is initialised with the existing assignments for EBICS 2.x and EBICS 3.0.

Each order type and each BTF may be assigned to a maximum of one business transaction.

10.

Only with separate authorisation (not part of the standard scope of the application): in the tab Push-Server you configure the connection to the TRAVIC-Push-Server. If you activate this functionality, at their own bank access the users can configure which messages they wish to be notified of for this customer bank access via push message.

11.

Only with separate authorisation (not part of the standard scope of the application): in the tab RFT – request for transfer you assign instruction keys to the bank access. Later the user can select the instruction keys during the creation of MT101 orders (order type RFT).

The customer bank access has been created.

Based on this customer bank access, bank accesses for protocol users can be created. The procedure is described in the section Creating your own EBICS bank access.

The users of this customer are informed after their next login via a notification on the start page that a new bank access has been created which they can initialise.

Procedure for creating a FinTS bank access

This function is not part of the standard scope of the application.

1.

Select Settings ➔ Customer settings, tab Customer bank accesses.

2.

Click on .

3.

Select Create FinTS customer bank access.

An input mask opens in which you can enter the details of the bank access:

4.

Enter the data of the bank access:

Field name

Description

Tab Bank access

Financial institution

Name of the bank access

This is the name under which the bank access is created. It is displayed for users.

Checkbox Main bank

If this checkbox is activated, the bank access may be used by all users.

If the checkbox is not activated, only users with the authorisation All bank accesses permitted can use this bank access.

You can find the user authorisations in the basic data of the user in the area Authorisations.

URL

URL of the FinTS server on the bank side

Overwrite interim transaction reports

Activate this checkbox if the bank server always sends all interim transaction reports.

This way, you can prevent interim transactions from being displayed repeatedly in the list of transactions.

SDC upload

Activate this checkbox to process files of a service data centre (SDC).

5.

Save the bank access.

6.

The tab TLS certificate opens.

The certificate is required for the encrypted transfer of data between the portal and the FinTS server.

The users can only use the bank access if the certificate has been accepted (provided that the bank access is assigned to the users).

On this tab, the known details of the certificate and the issuer are displayed.

The value in the field Certificate status has the following meaning:

Accepted by user: The TLS certificate has been accepted by a user.

Accepted by JVM: The downloaded certificate has been accepted automatically (by the JVM, Java Virtual Machine) because it has been issued by a trustworthy certification authority.

Not accepted: The certificate has been downloaded but not accepted, because there are doubts as to its authenticity. Communication with the FinTS server is not possible.

No certificate available: The certificate for encrypted communication has not been successfully downloaded yet.

7.

If the certificate has not been accepted automatically: Click on Download TLS certificate.

As soon as you click on Download TLS certificate, the TLS certificate is set to Not accepted. The bank access cannot be used by the users until you confirm the authenticity of the certificate.

8.

Check the authenticity of the certificate.

9.

If you are certain that the certificate was issued by a trustworthy certification authority, click on Accept TLS certificate.

The status of the certificate changes to Accepted by user.

10.

Go to the tab Bank codes.

11.

Click on .

12.

Enter the bank code and the bank name for the customer bank access.

13.

Save your input.

The application downloads the bank parameter data from the financial institution with the specified bank code.


If the bank parameter data cannot be downloaded currently, the application will display a corresponding message. Click on Save anyway. The bank parameter data will then be downloaded by the user during the creation of an own bank access based on the customer bank access.

Continue with step 16.

14.

The mask area TAN procedures is displayed, where you can link the TAN procedures available in the application with the TAN procedures provided by the financial institution.

15.

The columns of the mask area have the following meaning:

Column

Description

Code

Code of the TAN procedure at the financial institution

TAN procedure on financial institution's side

Name of the TAN procedure at the financial institution

Supported TAN procedure

TAN procedure of the application that is assigned to the TAN procedure provided by the financial institution

From the selection list (in edit mode), you select a TAN procedure of the application that is to be assigned to the TAN procedure provided by the financial institution.

All supported TAN procedures are offered to the user for selection during the initialisation of his bank access.

Note:

TAN procedures which you assign the value Is not supported are locked. These TAN procedures are not automatically assigned.

The mask-specific buttons have the following meaning:

Column

Description

Request TAN procedures

Requests a list of TAN procedures at the financial institution

Assign automatically

Automatically assigns the TAN procedures of the application to the TAN procedure provided by the financial institution

The button is only selectable if at least one TAN procedure is not assigned yet and does not have the value Is not supported.

TAN procedures that have already been assigned are not changed.

Tip:

If you wish to replace current assignments by an automatic assignment, select the value -- from the selection list, save your input and click on Assign automatically.

Attention

It cannot be guaranteed that all TAN procedures sent by the financial institutions are known to the application. Therefore please check if the automatic assignment of the TAN procedures is suitable for you.

16.

To specify another bank code for this customer bank access, repeat the steps 11-15.

17.

To execute automatic download orders for this bank access in the menu File manager, activate the checkbox Activate automatic download orders.

Please note that costs can arise from TAN requests via a mobile device.

The FinTS customer bank access has been created.

Based on this customer bank access, bank accesses for protocol users can be created. The procedure is described in the section Creating your own FinTS bank access.

The users of this customer are informed after their next login via a notification on the start page that a new bank access has been created for which they must specify a PIN if they want to use it.